 TECH
TECH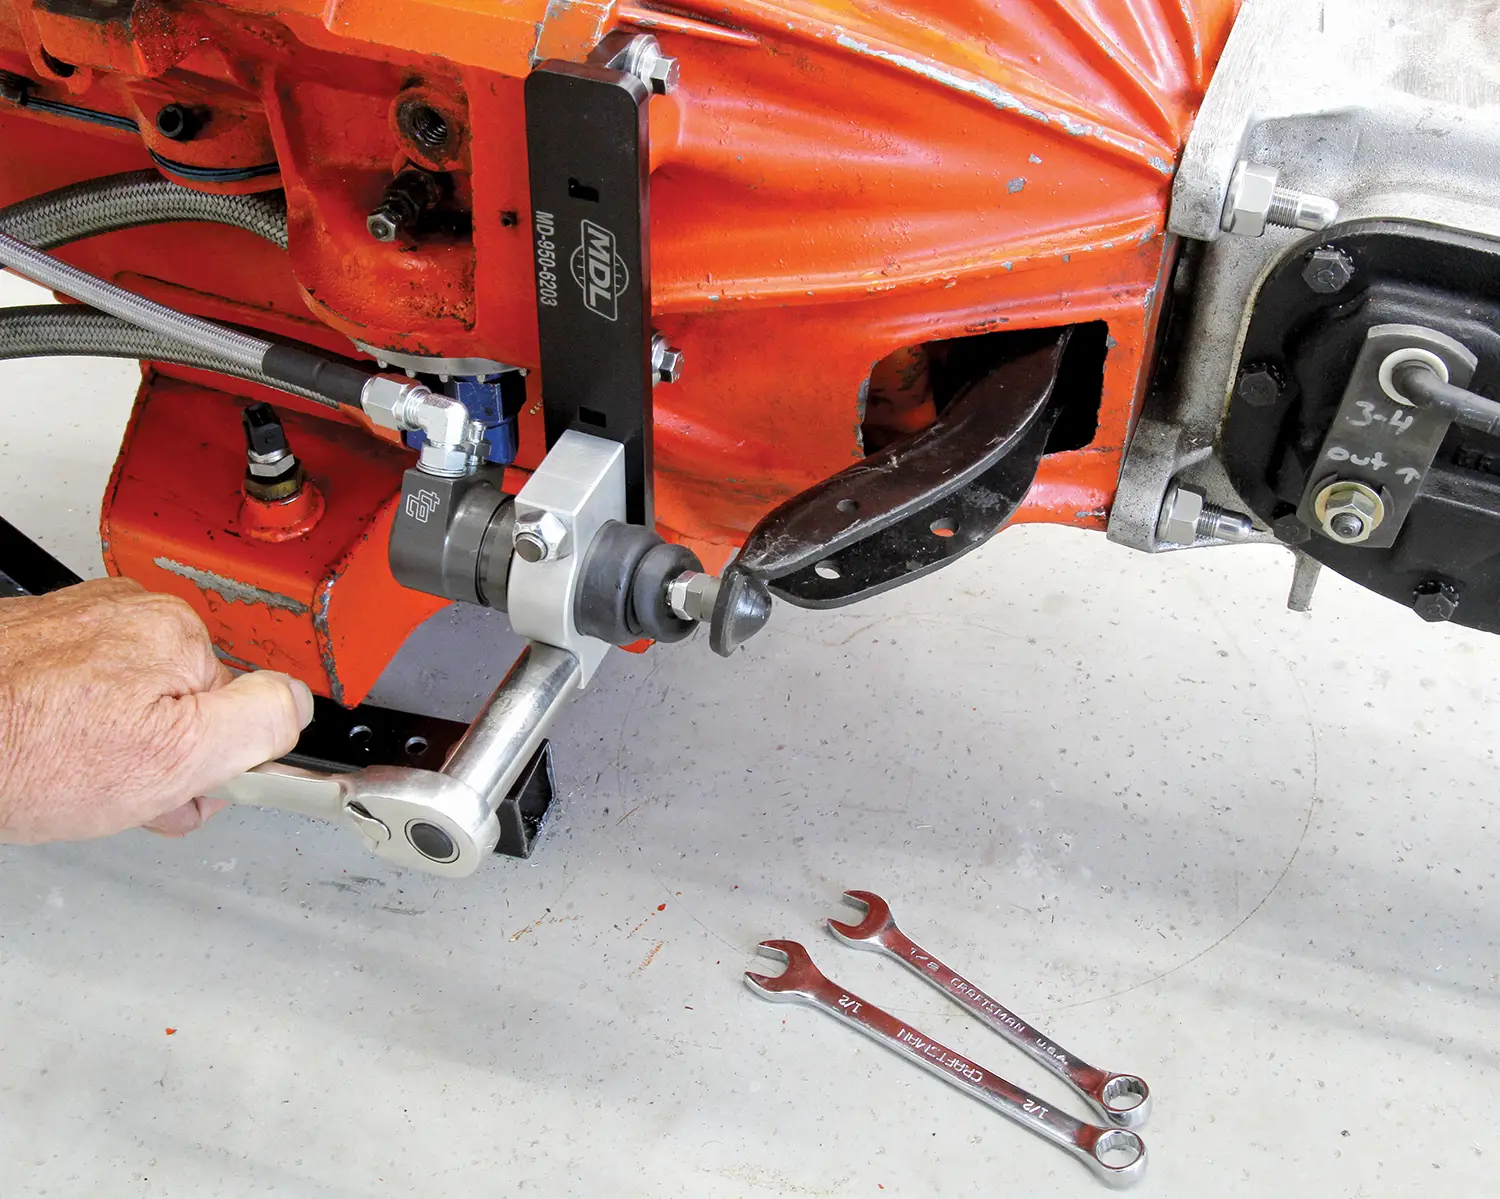
 Images by the Author and Courtesy of Modern Driveline
f we look at the trends of modern muscle car development, it’s easy to see there are many good reasons for adapting late-model production car ideas to older machines. Among them is hydraulic clutch actuation. The OEs initiated this back in the 1980s to eliminate the cumbersome mechanical Z-bar linkages and cables, choosing instead to use hydraulic pressure to do the job of releasing the clutch.
The contemporary approach is to use a hydraulic clutch release bearing with a hydraulic line from a separate clutch master cylinder bolted to the firewall. This system works extremely well. The aftermarket hydraulic clutch release embraced this idea with several companies offering complete kits.
Recently, Modern Driveline (MDL) introduced a new/old twist to this approach. One of the earliest OE hydraulic tactics was to retain the original mechanical release arm and bearing but actuate the arm using an externally mounted slave cylinder. As an example, C4 Corvettes, third-gen Camaros, and late 1980s and early 1990s GM pickups all used a similar master and external slave cylinder configuration.
This approach offers some distinct advantages compared to an internal slave release bearing. The most significant is that if there is a problem with the slave cylinder, such as a leak or a bad connection, all hydraulic service work can be performed without removing the transmission. Any issue with an internal hydraulic release bearing requires removing the transmission to service the unit. Another opportunity for this system is with LS engine swaps where the LS block does not offer a ball stud position to mount the Z-bar linkage.
MDL’s Eliminator series slave package offers sufficient travel to fully release a typical GM diaphragm or earlier three-finger pressure plates often with slightly less pedal effort compared to a manual linkage.
MDL’s Lightfoot hydraulic master cylinder kit is obviously designed to work in conjunction with the Eliminator slave system. The Lightfoot master is a more traditional conversion for a Chevelle or other A-body using an angled firewall bracket that mounts the master cylinder and is designed to work with the stock factory clutch pedal. The system is not difficult to install and includes a remote reservoir.
Of course, MDL also offers similar systems for other Chevrolet and GM vehicles as well such as first- and second-generation Camaros, 1968-1972 Chevelles, C10 trucks, first- and second-generation Novas, 1963-1979 Corvettes, and 1955-1957 Chevys. Plus, there are Buick, Olds, and Pontiac A-body applications.
For our installation, we started by bolting on a new steel flywheel, clutch, and diaphragm pressure plate to the engine and followed that with a factory aluminum bellhousing. The system we ordered from MDL was designed for the longer of the two release arms that use the pocket or dimple. There are two different lengths of release arm so it’s important to know which one you have when ordering the remote slave system. The older clevis-style release arms can also be converted to a dimple style.
If you need a stock-style aluminum bellhousing to convert from an automatic, or you just need a new bellhousing, we’d suggest the new generation Lakewood aluminum bellhousings because the testing we’ve done reveals this piece benefits from excellent machining. This produces a very concentric center input hole that positions the bellhousing so that total indicated run-out is well within specs, so you shouldn’t need to mess with offset bushings.
Of course, there are several bellhousings to choose from. MDL offers several options, including those from Quick Time where the quality and alignment is among the best in the business.
To begin, we also added a new clutch and pressure plate kit for our neutral balance 383ci small-block Chevy. This clutch is designed to be compatible with the 26-spline input shaft for the Super T-10 four-speed transmission we’re using. We also added a new pilot bushing, which should be added anytime there is service to the clutch. Of course, a TREMEC TKX five-speed would be an even better idea. That’s on our wish list for future upgrades.
We mounted the bellhousing along with a new, longer, dimple-style release arm. With the new clutch installed and the transmission in place with a new release bearing and longer release arm, we were ready for the slave installation. We won’t run through all the installation points as they are covered in the detailed instructions included with the kit.
Perhaps the most important point is to ensure that the release arm should point slightly forward at the point where it contacts the slave pushrod with the clutch fully engaged. This orientation creates the least amount of slave cylinder movement to produce proper clutch release. If your mechanical clutch linkage worked properly before the conversion to the hydraulic system, then the hydraulic swap should be relatively easy.
The only modification we had to make to mount the MDL slave cylinder was to trim a small portion of our stock GM 403 aluminum bellhousing to allow the slave bracket to sit flush on the bellhousing. This is covered in the instructions and required minimal time using a die grinder and an aluminum cutter.
With the bracket installed using the two bellhousing mounting holes we then attached the slave cylinder to the bracket. There are three ribs that can be used to locate the slave to the bracket. We ended up using the end rib, which pushed the piston nearly all the way into the slave cylinder. This allows sufficient room for piston travel and clutch release. We then adjusted the acorn and jamb nut until we had a slight amount of free play between the release bearing and clutch fingers when compressing the piston in the slave cylinder.
We didn’t install the master yet for this sequence, but all that would remain would be to install the clutch master cylinder, bleed the system, and we’d have a modern hydraulic clutch release system for our 1966 Chevelle. Think about that the next time you’re wrestling with a balky mechanical Z-bar system.


 SOURCES