ACP department heading TECH
InTheGarageMedia.com
fabricator welds a custom patch panel on the rear quarter of a 1966 Chevelle wagon at Old Anvil Speed Shop
1. Old Anvil Speed Shop shows us how to fabricate a custom panel from scratch.
Metal Magic typography

How to Fabricate a Custom Fuel Door Filler Panel

By Tommy Lee Byrd Images by Taylor Kempkes
M

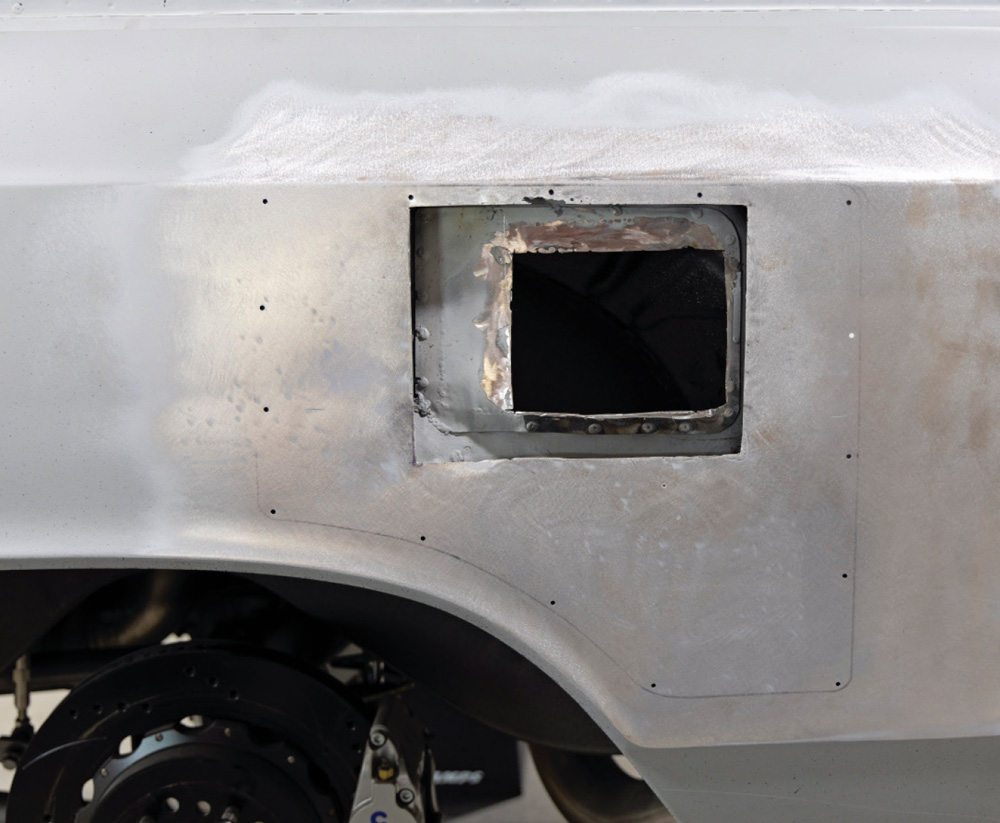
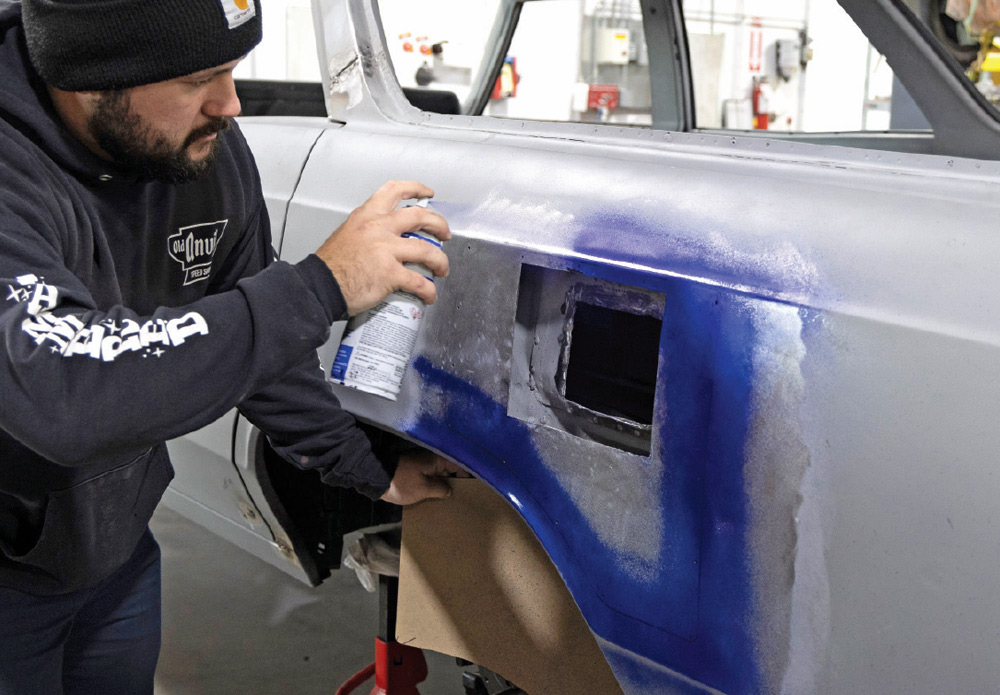
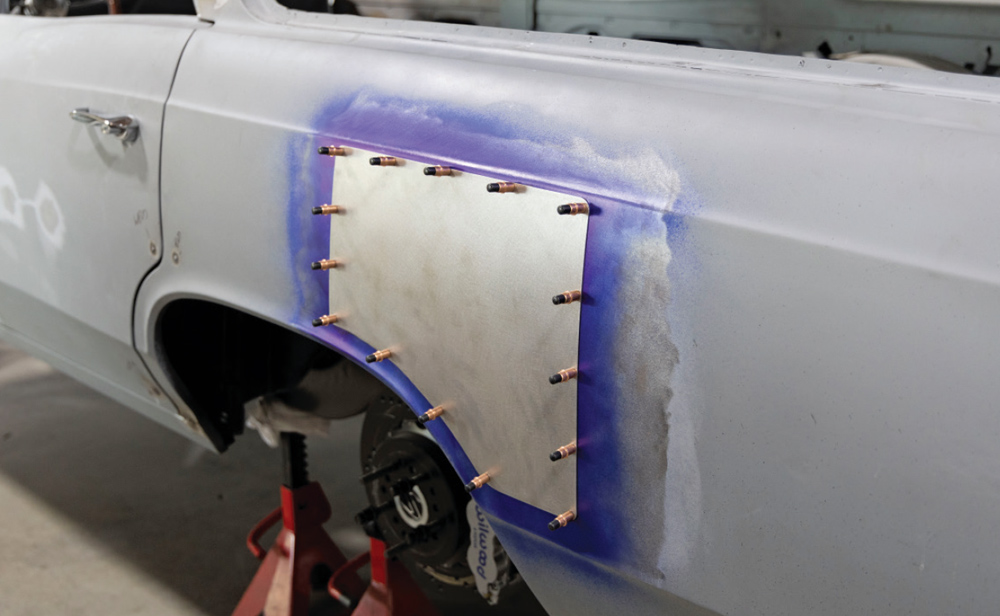
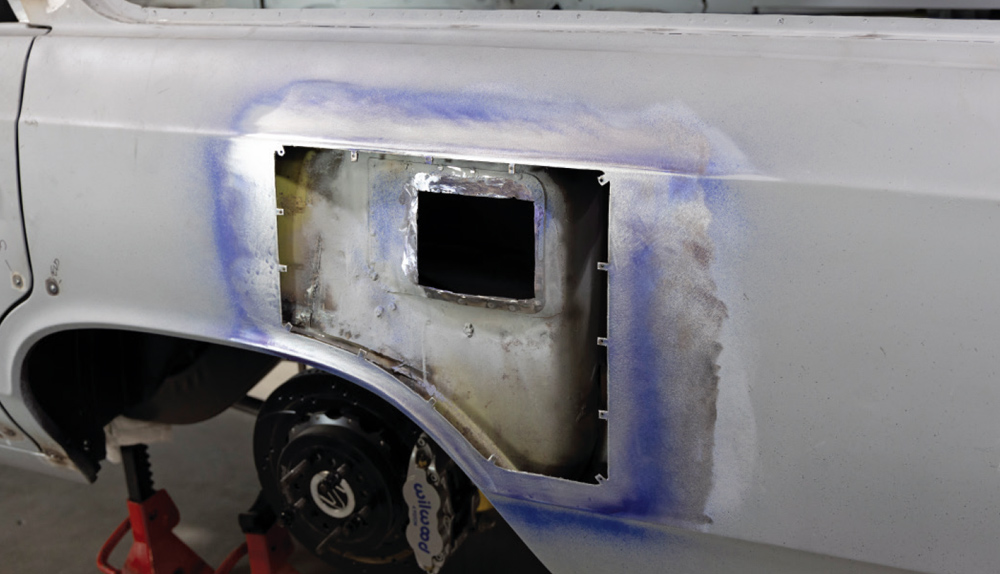
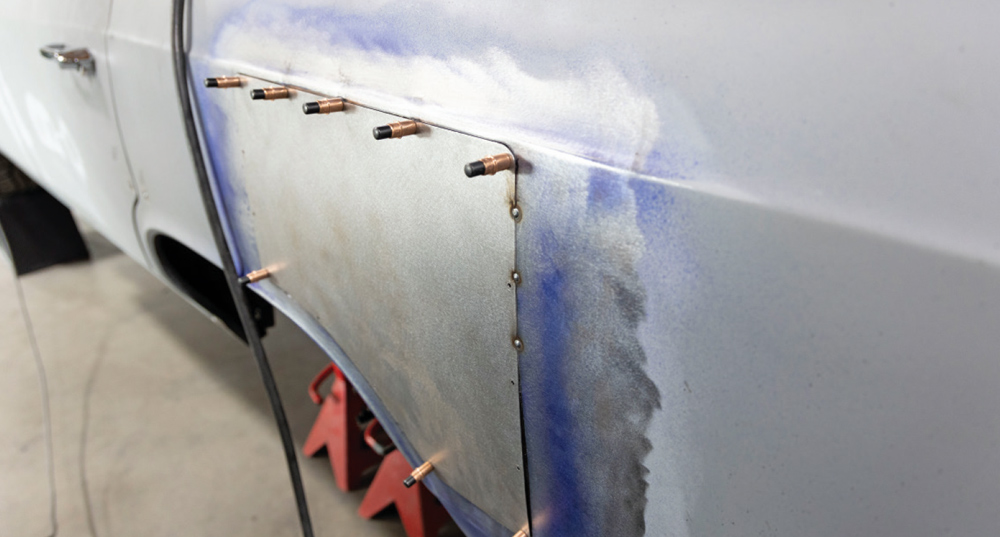
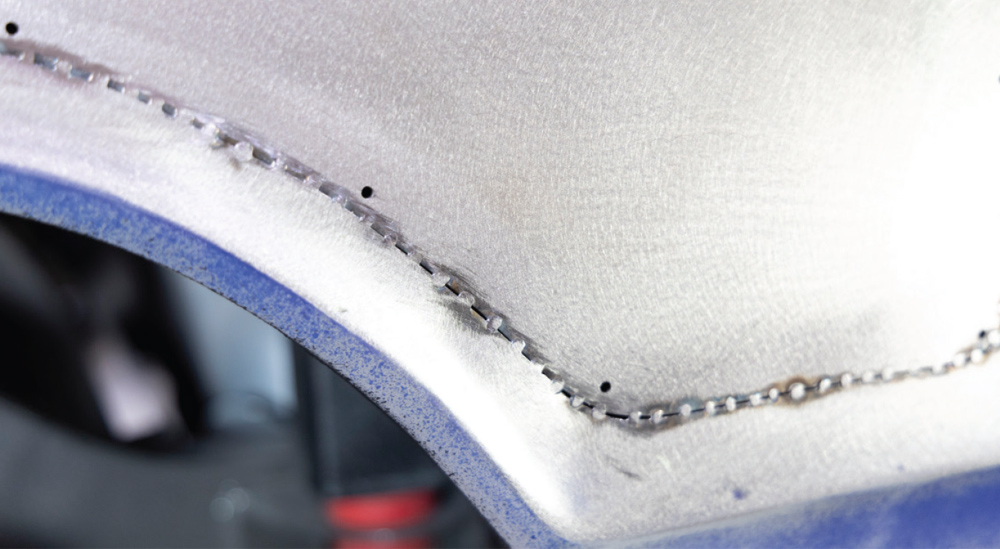
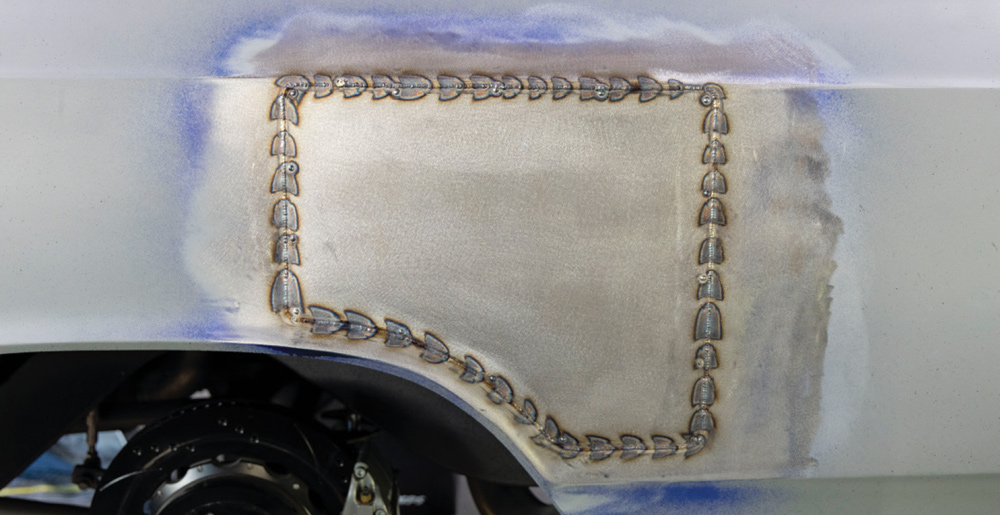
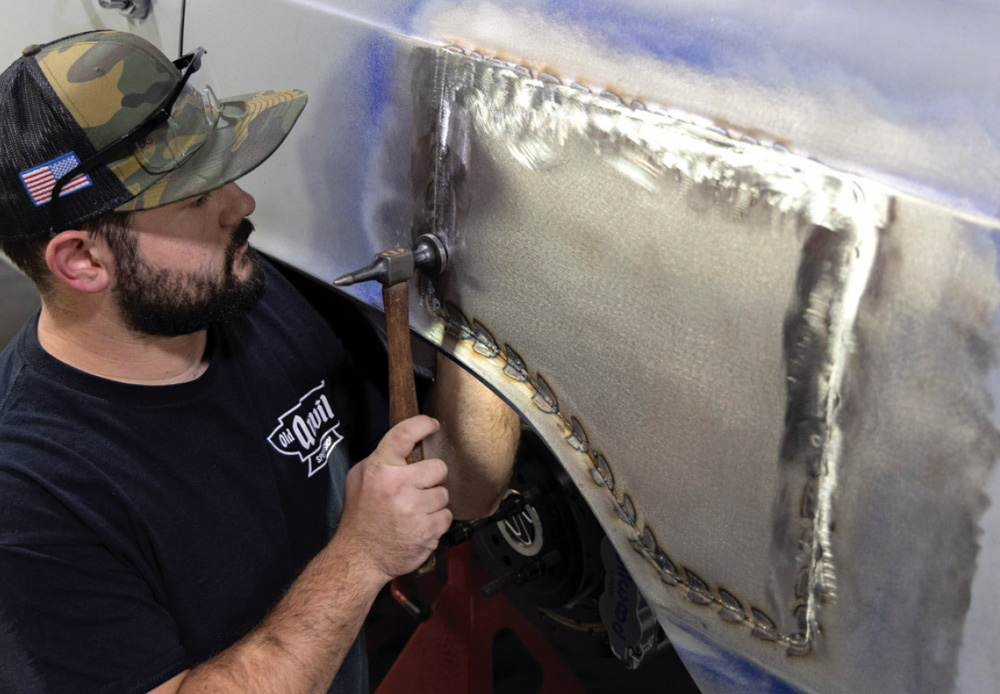
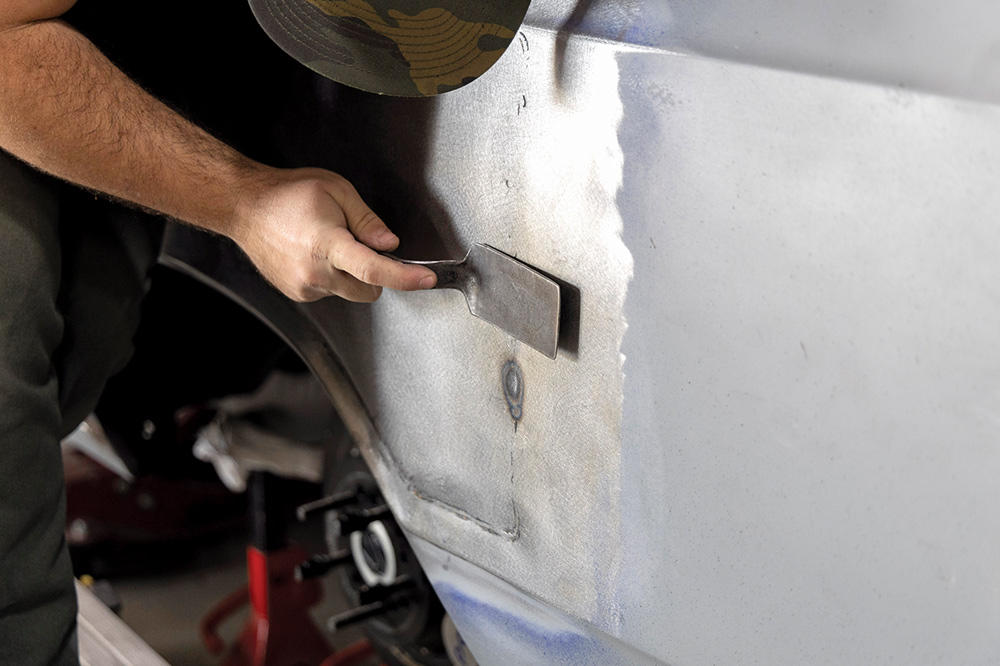
etalwork is an art that requires patience and experience to produce a show-quality finished project. There are many techniques when it comes to metal fabrication. We followed along with Old Anvil Speed Shop in Orange, California, as Brandon Gerringer tackles a challenging project. He was tasked with filling in the original fuel filler door on Mike Selvaggio’s 1966 Chevelle station wagon. While some might say you could simply lay a piece of metal in the existing stamped hole, this wouldn’t provide a flush fit, and the stamped edge wouldn’t allow any extensive metalworking to straighten the panel. The result would be too much body filler.

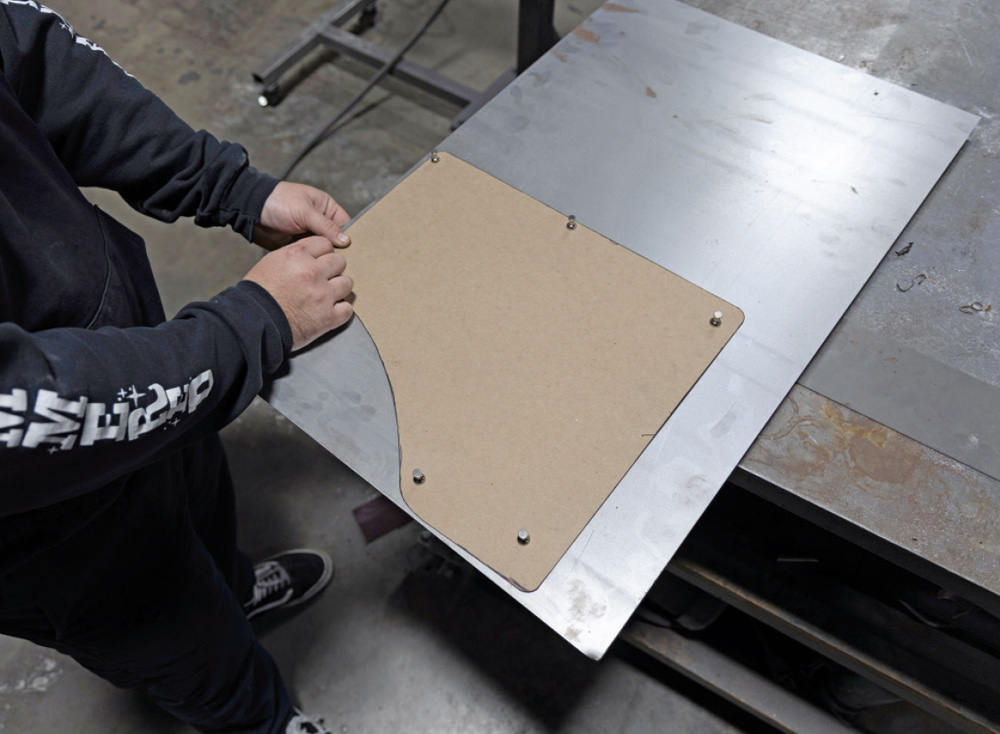
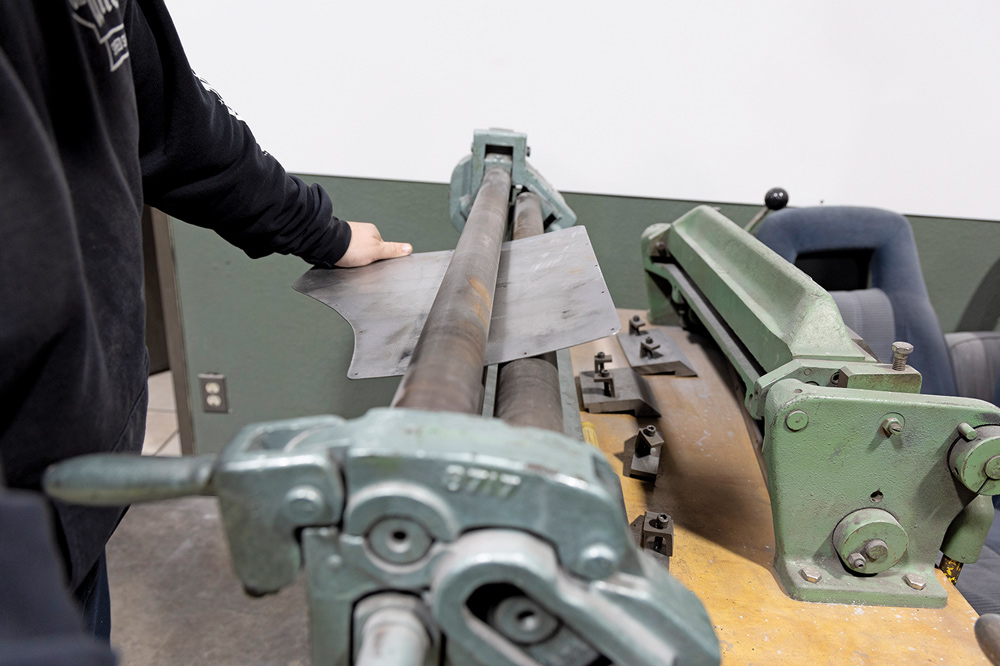
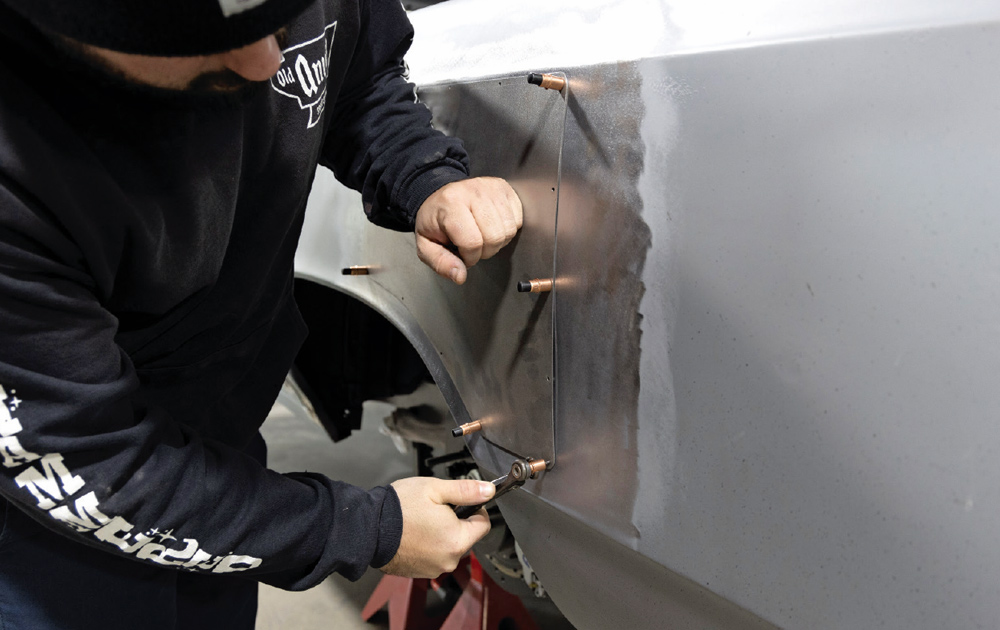
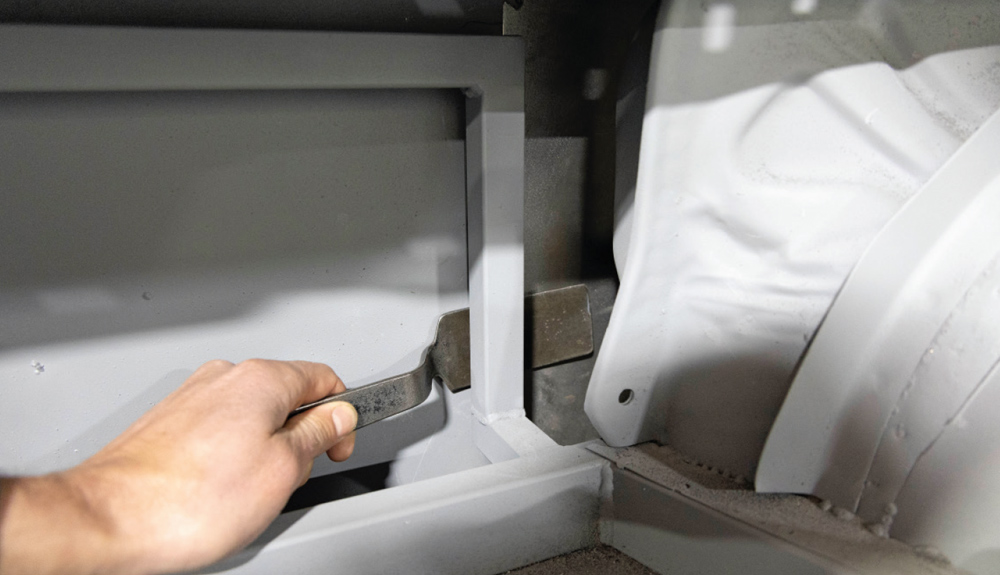
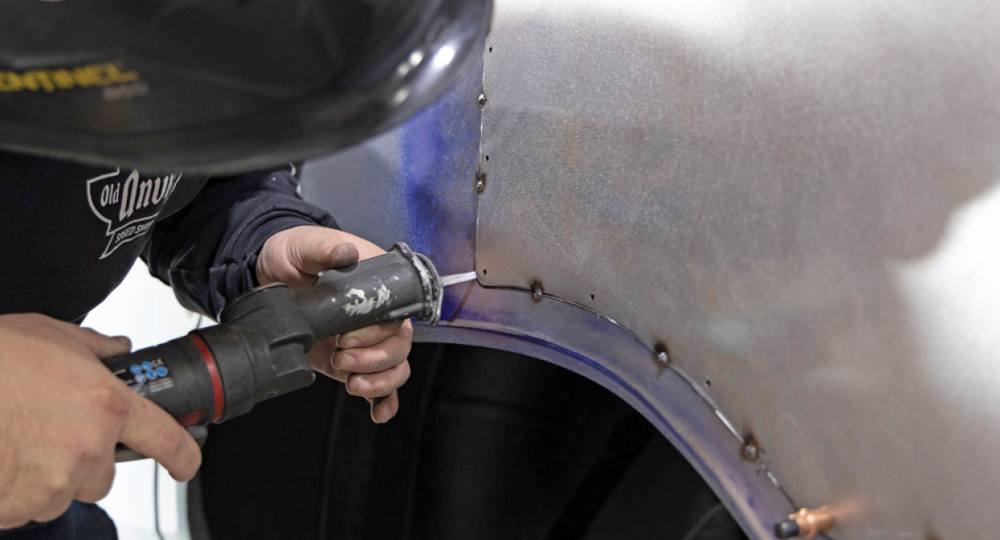
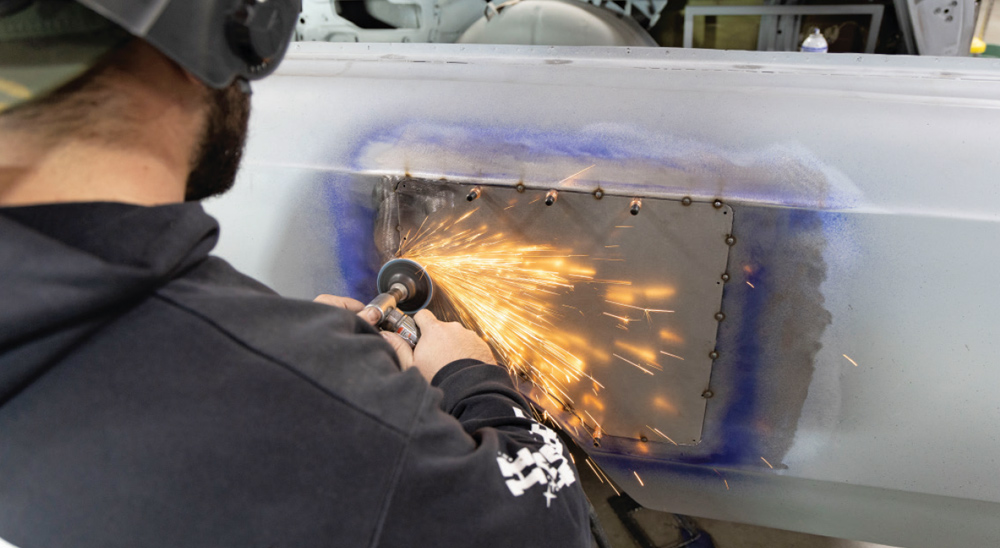
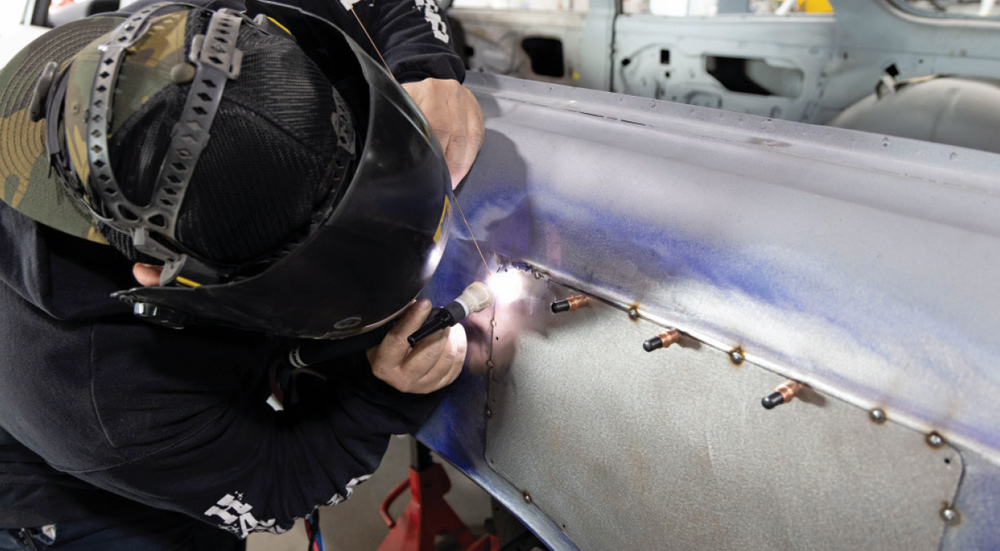
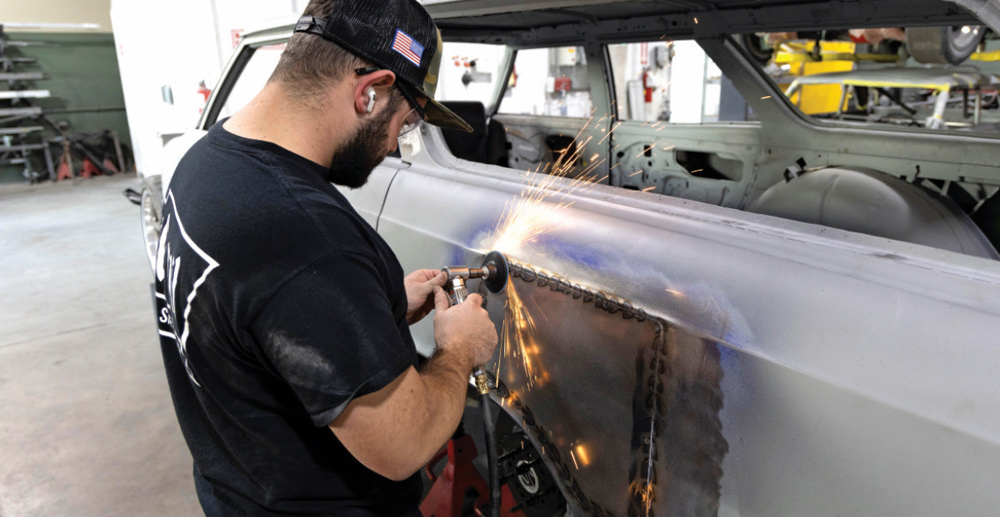
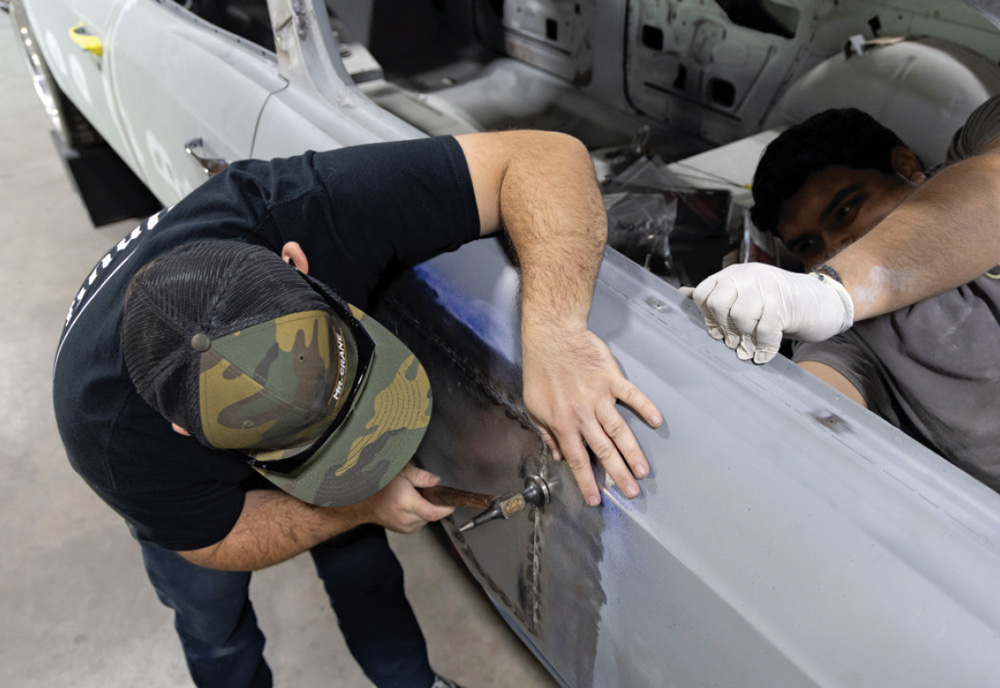
When Gerringer took on the project, he planned it out so he could utilize the strongest areas of the quarter-panel, while also positioning the panel in an area that could be hammered and dollied before, during, and after the panel installation. He used an assortment of tools, most of which are readily available. He used an angle grinder, cut-off wheel, and body saw for the slicing and dicing, and then used various hammers, dollies, and body spoons for working the metal. A MIG welder was used for tack welds and a TIG welder was used for final welding.

A project like this is not for the faint of heart. It requires a tremendous amount of patience and a keen eye for detail. Expect to spend several nights in the shop fine-tuning a custom panel of this nature. Gerringer makes it look easy, so follow along with the step-by-step process of shaving the fuel door on this highly customized Chevelle station wagon.

close-up of the cut-out fuel door area, revealing bare metal and precise weld marks for the modification
2. An ongoing project at Old Anvil Speed Shop, Mike Selvaggio’s 1966 Chevelle station wagon is receiving many custom tricks, including a relocated fuel filler. That leaves a gaping hole to fill in on the driver side quarter-panel.
cardboard template is secured to the quarter panel, outlining the custom patch panel shape before fabrication
3. The first step is to design the panel in a way that takes advantage of the strongest parts of the quarter-panel. Notice how the lower edge follows the strong wheel opening and fits up to the upper body line.
cardboard template is placed on a sheet of metal, ready to be traced and cut for the replacement panel
4. After some fine-tuning, the paper template is traced onto a piece of steel. Notice the assortment of magnets holding it in place—a great tip for the at-home fabricator.
new metal panel is cut and placed beside the template, showing the exact fitment for the fuel door section
5. Brandon Gerringer is in charge of this metal fabrication project and lays out his tools and panel in preparation for the project. Cleco fasteners are handy for a project of this nature.
fabricator uses hand shears to refine the edges of the new patch panel for a seamless installation
6. A Capri Tools metal hole punch is used to punch 15 holes in the new panel. A punch is much quicker and easier than drilling holes. The Cleco fasteners Gerringer uses require a 1/8-inch hole.
metal panel is shaped on a roller machine to match the contour of the Chevelle's rear quarter panel
7. Although the quarter-panel appears to be flat, it has a slight bend in it. Gerringer uses a roller to bend the new panel a little at a time until the proper crown is achieved.
new patch panel is test-fitted using Cleco fasteners, ensuring a flush fit before final welding
8. Cleco fasteners are the perfect tool for holding the new panel in place. At this point, the new panel is overlapping the original quarter-panel.
technician sprays layout fluid on the fuel door opening to mark precise cuts for a clean installation
9. After the panel is test-fitted, Gerringer removes it and sprays Dykem layout fluid on the underlying quarter-panel.
patch panel is fully secured with Cleco pins, ready for final welding and blending into the body
10. All 15 of the Cleco fasteners are used to tightly hold the new panel against the existing quarter-panel.
fabricator precisely aligns the patch panel using Cleco fasteners before final welding on the 1966 Chevelle wagon
11. Gerringer uses an awl to scribe a line into the layout fluid. Notice that the Cleco fasteners are positioned as close to the edge of the panel as possible, which will help with the next step.
high-speed cutting wheel sparks as excess metal is trimmed from the patch panel for a seamless fit
12. A cut-off wheel is used to closely follow the scribed line in the quarter-panel. Gerringer leaves small tabs in place, allowing the continued use of the Cleco fasteners.
fuel door opening is fully cut out, revealing the inner structure and bracing for the new modification
13. With the quarter-panel cut out, you can see the small tabs left behind. The small tabs can bend inward ever so slightly so the new panel fits flush.
grinding disc smooths the edges of the quarter panel, ensuring a flush transition for the welded patch
14. The edges of the original quarter-panel are fine-tuned with an angle grinder to ensure a nice flush fit.
straightedge is used to verify proper alignment of the patch panel before final welding
15. One last test-fit reveals a low spot at the rear of the panel. It’s best to address this now than after the panel is welded in.
interior bracing is adjusted to support the newly installed patch panel for structural integrity
16. A flat body spoon is used to work the existing quarter-panel and the new panel. Luckily, a piece of the custom inner structure provides a backstop and a leverage point to massage the metal outward.
MIG welder fuses the new panel to the quarter panel, ensuring a strong, factory-like finish
17. With the fitment to his liking, Gerringer starts tack-welding the new panel into place.
welded patch panel is secured in place, showing a clean and precise fitment
18. After a few tack welds are holding the panel, Gerringer removes some of the Cleco fasteners to give him some room to work.
fabricator uses a pneumatic punch to prepare the panel for final welding and seamless blending
19. A body saw uses a very thin blade, so that’s the tool of choice for removing the Cleco tabs after the panel is fully tacked in.
final grinding process smooths out the welds, completing the fuel door delete modification
20. An angle grinder is used to dress the tack welds and prepare the area for final welding.
TIG welder precisely fuses the patch panel to the quarter panel for a seamless repair on the 1966 Chevelle wagon
21. While he used the MIG welder for the tacks, Gerringer breaks out the TIG welder for final welding. The TIG allows for better heat control and a nice flat weld that’s easier to work.
weld beads along the wheel arch ensure a strong and even bond for the newly installed metal panel
22. At this point, Gerringer is still spot-welding the panel every inch. He grinds the welds flat, preparing to lay down final welds.
expert welding technique creates uniform stitches along the patch panel, eliminating the fuel door opening
23. Gerringer works carefully to prevent warping. Notice the 2- to 3-inch welds. He stitches it together, then moves to another spot to allow cooling.
completed welds outline the patch panel, securing it firmly in place for a smooth bodywork finish
24. Eventually, the new panel is completely welded. Gerringer also welds the 1/8-inch holes left behind by the Cleco fasteners.
die grinder removes excess weld material, preparing the surface for final smoothing and blending
25. An angle grinder is used to flatten the welds, but Gerringer is careful not to remove too much material. If any pinholes or imperfections are in the panel, he can fill them in with the welder.
panel hammer and dolly fine-tune the welded area, ensuring a flawless transition to the original body lines
26. Metal finishing on a panel of this nature is a two-man job. Gerringer grabbed some help to operate the dolly from inside the car while he hammers the outside of the panel.
heat shrinking process refines the metal panel, minimizing distortion for a perfect factory-like finish
27. Gerringer can reach the front portion of the panel, so he hammers and dollies the imperfections out of the existing quarter-panel and new sheetmetal.
pneumatic sander smooths the surface, blending the repair seamlessly into the quarter panel
28. A flat body spoon is used for additional metalworking after Gerringer has continued grinding the welds and filling in imperfections.
final sanding stage preps the quarter panel for primer, completing the fuel door delete modification
29. After the panel is hammered and worked, Gerringer uses a dual-action sander to remove any small imperfections and prepare the panel for primer and a skim coat of filler.
fully blended repair showcases a smooth, factory-like finish, ready for primer and paint
30. Custom metalwork isn’t a fast process. Be prepared to spend several days fine-tuning the metal before it’s ready for body filler and primer.
SOURCE