ACP department heading TECH
InTheGarageMedia.com
First-Gen Camaro Door Glass Installation
Tips and Tricks for Getting Those Side Windows Adjusted Perfectly for 1968-1969 F-Bodies
BY BARRY KLUCZYKImages by THE AUTHOR
T

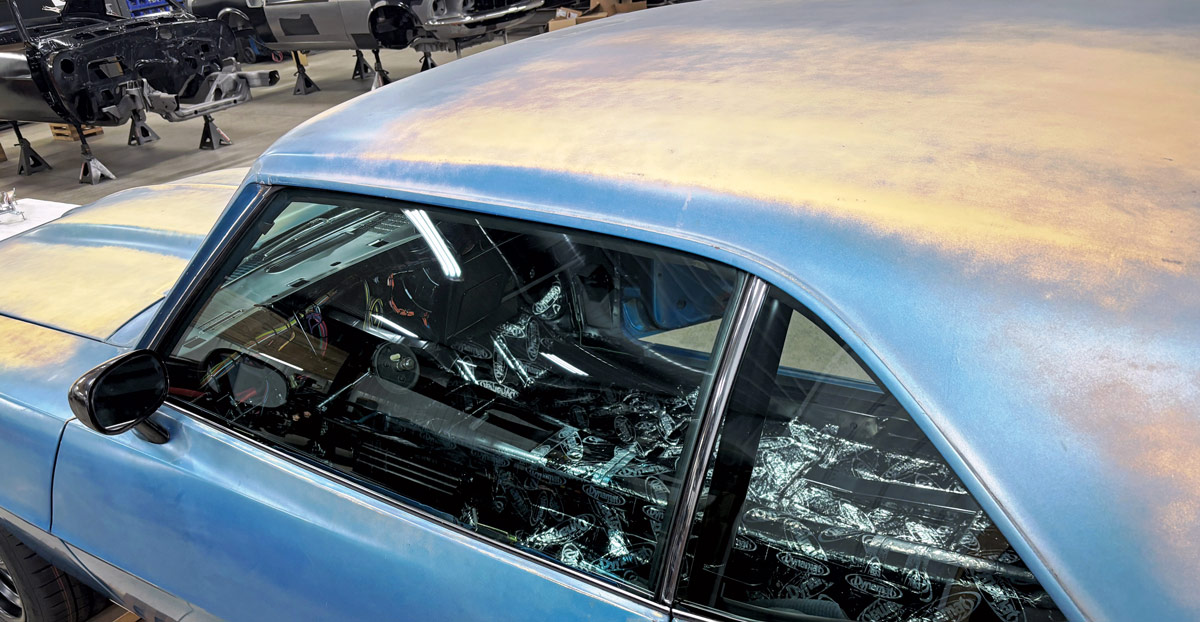
here’s nothing like original sheetmetal on a vintage car, but original glass is a different story. Scratches, pitting, hazing, and more can detract from an otherwise-strong appearance.

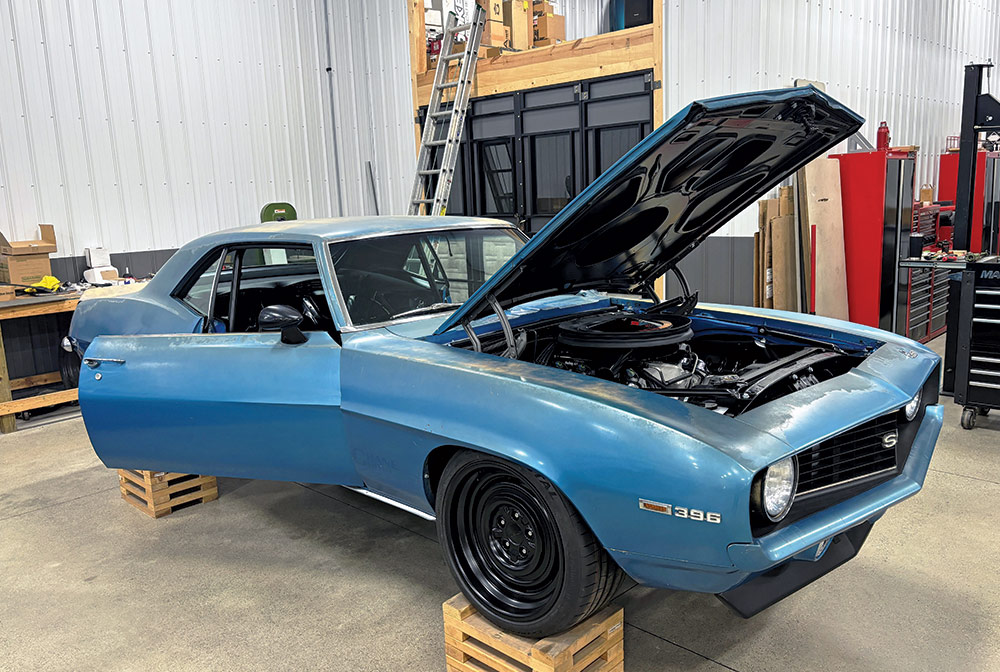
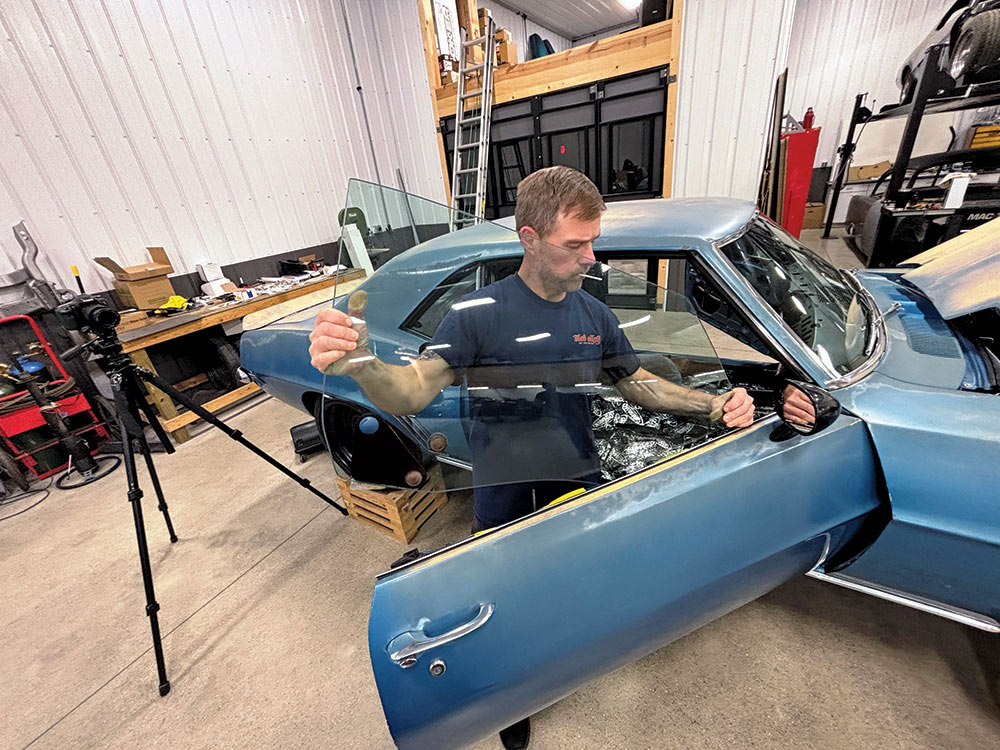
That was the dilemma Mark Stielow faced with his latest Camaro project, so he had Sled Alley replace all its glass, including the door windows. Dropping in the new windshield and rear window were straightforward enough, but the intricacies of the door windows are what prompted us to following along and take notes.

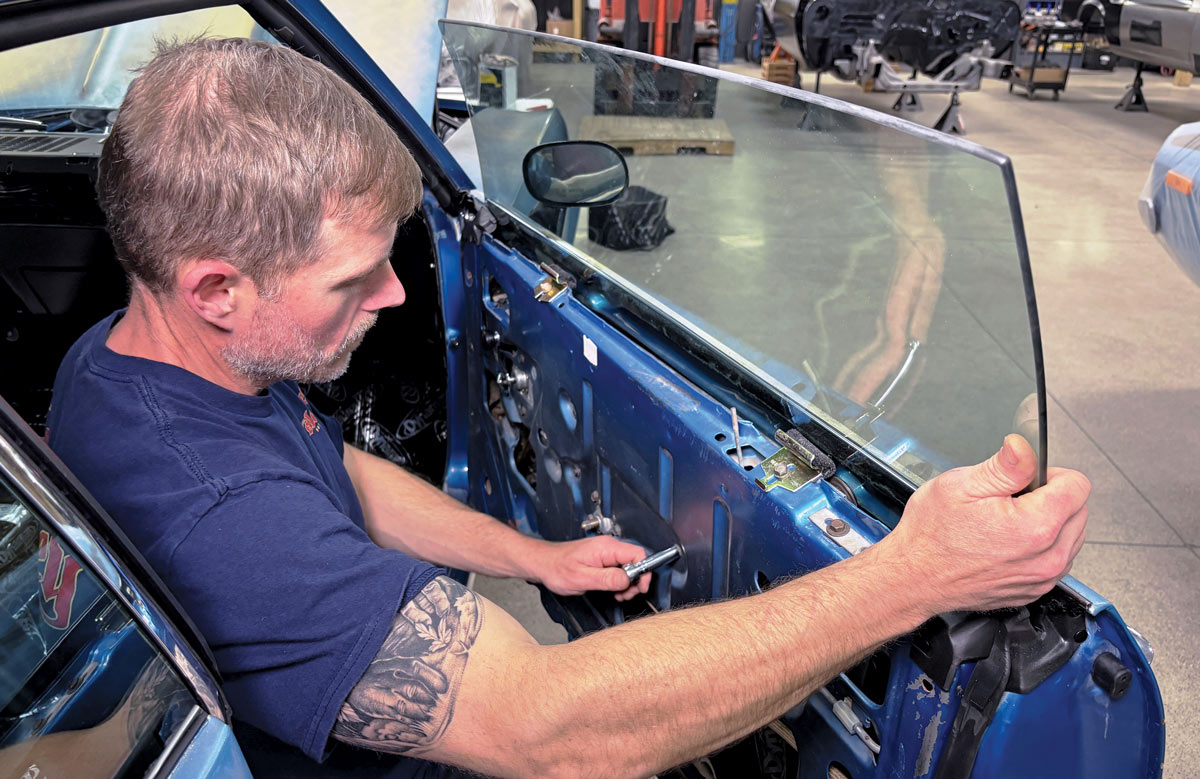
If you’ve never attempted it, replacing the door glass on a vintage Chevy can seem easy enough at first but can quickly turn into a maddening exercise. Fine adjustments must be made to the fore/after positioning, along with the front-to-rear tilt, in order to position the glass correctly and frame it properly in the door opening.

It is particularly challenging on A-bodies, F-bodies, and other models with frameless door windows. Getting it wrong can lead to interference with the rear quarter-window or gaps at the surrounding window rubber that can create the sort of annoying wind noise that sends a spouse to a dating app after about 15 minutes on the highway.

“Installing the glass is the easy part—it’s nailing the adjustments that really take time and attention to detail,” Matt Gurjack of Sled Alley says. “Seemingly small adjustments can make a big difference and you’ve got to make sure everything is spot-on and fits tightly against the seals if you don’t want those wind leaks.”

All the glass for this project came in a package from Heartbeat City. Stielow specified the Soft Ray–style green-tinted glass of the RPO A01 option for 1969, which included subtle yet noticeable green tinting on the door windows, quarter-windows, and rear window as well as the windshield. There was also an A02 option that included tint only on the windshield, while entirely non-tinted glass was standard. Just less than half of all 1969 Camaros were ordered with the A01 all-tinted glass.

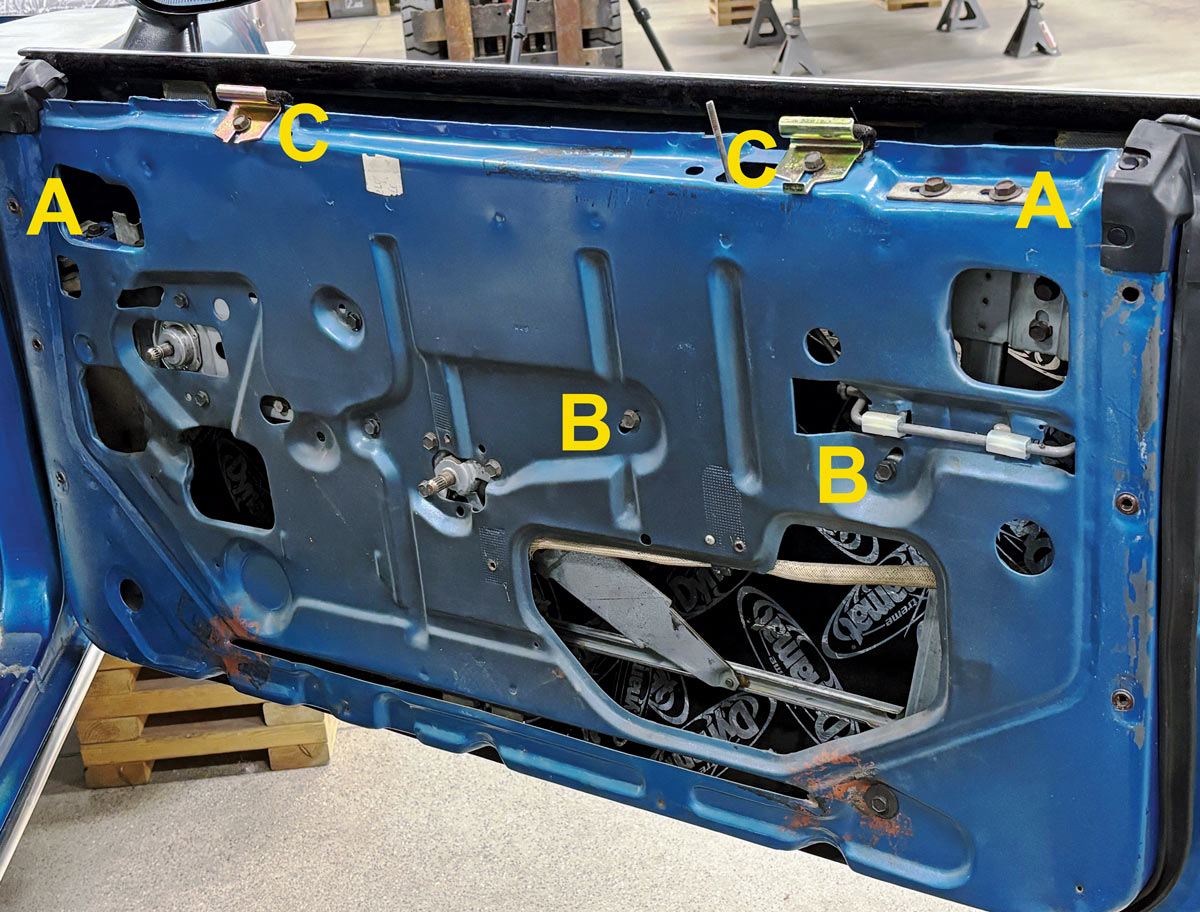
The glass and hardware are the same for 1968 and 1969 Camaros, while the 1967 models have their own glass of course because of the doors’ vent windows. Fortunately, the door hardware for all is readily available. While the glass is also relatively easy to find, Matt Gurjack says the quality of the glass from Heartbeat City, which comes from manufacturer PMK Diamond Glass, is his preference.

“It’s very good and we’ve never had any problems fitting it,” he says.

Overall, this is a project that virtually any enthusiast could tackle and expect excellent results, as long as the time is taken to sweat the adjustment details. Sled Alley has worked on more early Camaros than TikTok has videos of people opening Amazon packages, so they’re able to fly through the installation and adjustments quickly, but a first-timer should be able to do each door’s glass installation and adjustments in less than two hours.

That makes it a good, DIY project for a weekend afternoon—and compared to settling for cleaned-up but scratched or hazed original windows, the results couldn’t be clearer.

car elevated on wood crates with doors and hood open
1. Work on Mark Stielow’s latest Camaro is nearing the finish line. The powertrain, chassis, and suspension work are done. Assembly of the interior comes next, but before the door panels are hung the door glass needs to be installed and adjusted.
closeup of quarter windows
2. The quarter-windows have already been installed at this stage, but more importantly, so have the door rubbers. Because the glass seals against them when the doors are closed, having them in place prior to installing the door glass is the only way to ensure they fit and seal properly.
green tinted glass from Heartbeat City
3. Sled Alley went to Heartbeat City for the glass, opting for the green-tinted versions that match the A01 tint option from 1969. The glass and hardware are the same for 1968 and 1969 Camaros.
closeup of roller guideplate holes
4. Holes at the bottom of the glass are for the roller guideplates and the studs that hold the door’s regulator roller channel in place.
person installing hardware on the glass guideplates
5. Fortunately, the original hardware for the glass was still in good condition and was transferred to the new windows after cleaning. Photos taken during disassembly provided a guide for the proper orientation of the parts when installing them on the new glass.
installed roller guides
6. After the roller guideplates are installed, they’re greased to provide low-friction movement.
various door hardware items
7. Door hardware, including the roller, rubber stops, and other elements are readily available from restoration parts suppliers, and it’s a good idea to replace the originals, even if these small pieces appear in good condition, as they get hard and brittle over time.
person applying yellow tape to edge of inner door panel
8. Before the glass is slipped into the door, some tape is laid on the bare edge of the inner door panels to prevent scratching.
lowered window track
9. Also, before the glass is installed, the window regulator should be lowered so the track is visible and accessible.
man inserting window glass between doorskins
10. In goes the window. It takes some finessing to get the rollers of the guideplate into the gap between in the inner and outer doorskins, but the easiest way is to tip the front of the glass down into the gap and get the front roller into the guide channel.
person holding window glass in place
11. With the front loosely in place, the rear corner drops down through the gap to find its home in the regulator’s channel.
closeup of bolt being tightened
12. Next, the glass is bolted to the regulator.
new slide installations
13. To keep the glass from rubbing and scratching against the inner doorskin, new slides are installed. They’ll be adjusted, too, but they simply need to keep the glass off the doorskin at first.
hand holding stop
14. At the rear of the door, the stop that limits the travel of the glass is installed and left loose for adjustment.
yellow capital letters labeling the door's adjustment locations and functions
15. Before getting too far into the adjustments, it’s worth a quick primer of the door’s various adjustment locations and functions. The “A” positions adjust the fore/aft position of the glass. The “B” positions adjust the front/rear tilt of the glass. The “C” positions move the glass in/out in relation to the glass against the door seals.
initial glass installation with glass aligned incorrectly
16. The initial installation showed the window’s position was pretty far off. It needs to be repositioned forward to fit properly in the door opening.
person adjusting bolts on door panel to fix glass's position
17. This bar, along with the corresponding adjustment point at the front of the glass enables the window to move forward to position it squarely in the door opening.
closeup of adjusted window position
18. That’s better. The window is positioned correctly within the door opening.
window glass not touching seal
19. But! The glass doesn’t quite come up and seal against the rubber at the front. The gap here would not only promote water intrusion but it would also create a heck of a wind noise.
man adjusting window's position
20. Adjustments with the tilt positions and the stop limiters helped get the front of the glass into the proper position. It’s a lot of small, give-and-take adjustments at this stage to get the glass just right.
closeup of corner against seal
21. Zeroing in on the final adjustments, the corners are checked to ensure the glass is positioned evenly as it rests against the seal. Here, it starts to stray too far inward at the bottom, prompting another slight adjustment.
man using tool to tighten fasteners
22. After about an hour of finessing, the glass has been adjusted and positioned properly and all the fasteners are tightened for the final time.
windows installed on car
23. Fresh glass and fresh seals should make for a quieter driving experience. The project isn’t difficult, but absolutely requires time, patience, and a good eye for detail.
closeup of G-body mirror
24. Curiously, in a car that maintains an otherwise-strict adhere to the factory appearance, later G-body outside mirrors seem out of place, but Mark Stielow insists on them for his cars because the mirror glass doesn’t jostle around on the racetrack like first-gen mirrors.
hand holding mirror against sandpaper
25. Sled Alley’s Matt Gurjack finds the replacement aftermarket mirror glass for the second-gen mirrors don’t typically fit the housings. They’re typically too large, so he rubs the edges on sandpaper until the fit is just right.
fixed mirror installation
26. The result is a perfect fit and a wobble-free mirror on the track.
SOURCES