 TECH
TECH
 Photography by The Author
ot rodding is a complicated, nuanced hobby, but part of its appeal is its science. Bench racing new techniques and analyzing successes and failures make it exciting. The car community is filled with us nerds trying to find our cars’ hidden, untapped potentials.
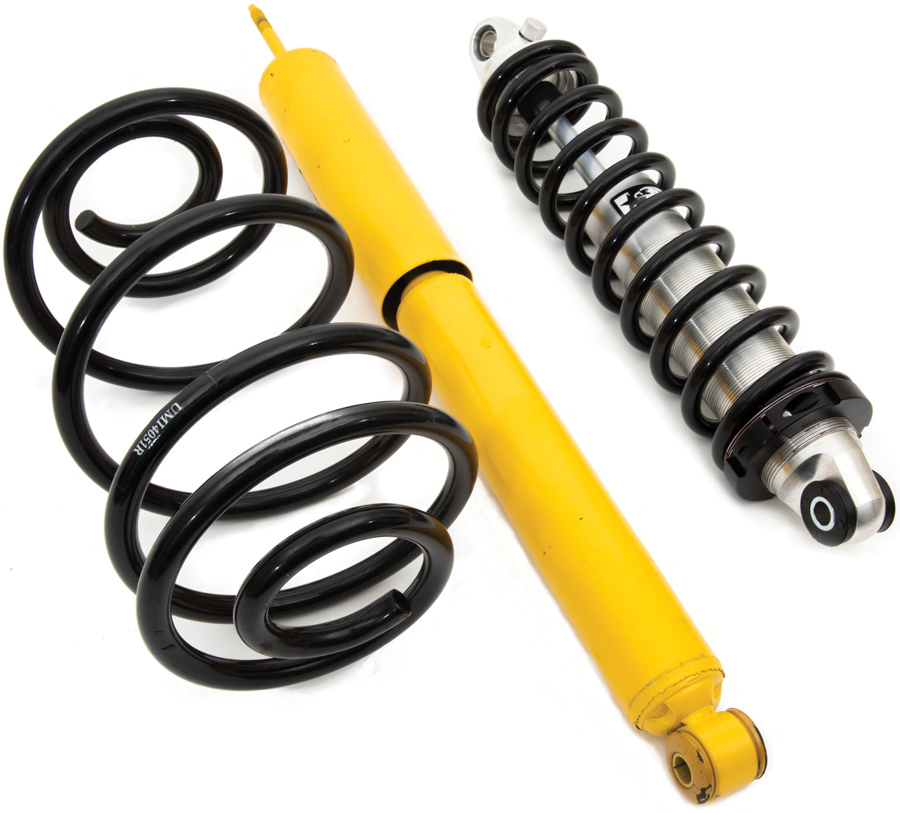
Suspension is the occasionally overlooked area that can garner huge improvements with your worn-out muscle car, and coilovers are a modern solution to vintage problems. They replace heavy springs and shocks with a package that’s easy to install, tune, and is significantly lighter. They can make drastic changes to your car’s driving characteristics.
Coilovers are a nicely packaged piece of performance goodness, but what should you consider when purchasing, how do you adjust them, and what are their differences? We break it down from a hot-rodding perspective—a degree in fluid dynamics not necessary.
“Coilovers are the most cost-effective way of lowering your car,” Aldan American owner Garrett Harmola says. Fine-tuning ride height is arguably the most helpful feature of coilovers.
“The stance can be perfect. When you have the spring mounted on the shock, you can start to adjust up and down within reason,” AFCO national accounts manager Eric Saffell says. Excluding some McPherson-style coilover designs, coilovers typically change ride height by changing the preload of the spring.
Does ride height change affect the performance of the coilover? Essentially, no. “There’s no detriment to changing ride height,” Saffell says. “Not until you get into an extreme situation like coil bind or being fully extended. The shocks will feel the same and operate the same, for the most part. Most shocks aren’t position sensitive in that respect, but there are exceptions.”
Most manufacturers will anticipate ¾ inch in or out with preload adjustment on top of the ride height range. For example, a company might list that their coilovers offer 2 inches of ride height change, like most muscle car applications. So, when you’re at the bottom of those 2 inches, your coilover should still maintain around ¾ inch of preload. Reliable companies, like those sourced in this article, will anticipate ride height change within the range of preload.
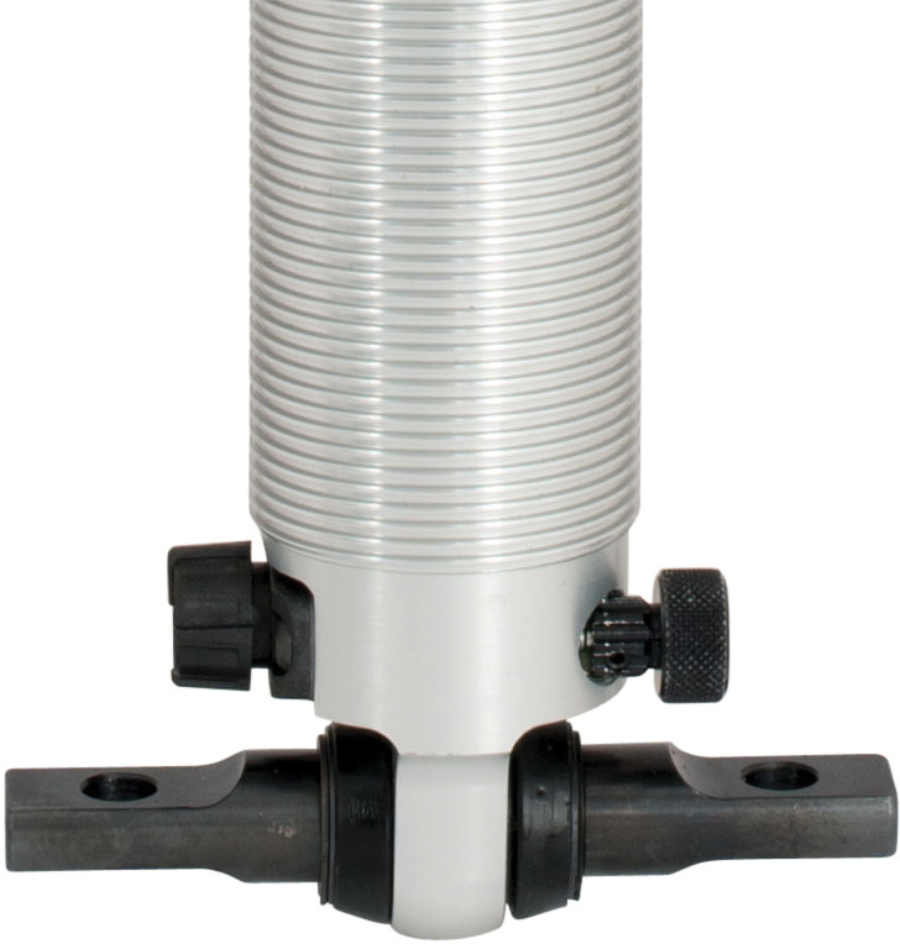
Inside the shock body is a piston surrounded by hydraulic fluid and connected to the inner rod. The fluid moves to either side of the piston as the shock moves up and down. The rate at which the fluid moves is determined by tiny holes in the piston. “The valve plates allow the fluid to flow through, and as you compress, it restricts the flow. When you separate those plates to allow more or less, you’re adjusting the speed of the shock,” Strange Engineering sales manager J.C. Casio says.
Manufacturers and shock tuners can adjust the holes with valves with different size holes (they look like washers or plates). “Valving” a shock can drastically change its characteristics. It can get more complicated, especially when you add nitrogen, which adds consistency to the shock’s fluid.
“The valving is where the magic is. We try to make a range of valving in a shock that’s significant enough to change the car. We have valving packages. If you get someone with standard valving, but they want stiffer, we can re-valve it and shift that valving range,” Casio says.
More companies have introduced bolt-in coilovers for muscle cars where the top of the spring and shock is identical to the OEM spring/shock. These lay into the factory frame spring pocket and shock mount. At the bottom is a bushing-mounted T-bar designed to mount where the OEM shock would bolt.
It’s a hybrid style that makes for super easy installation, no spring compressor needed, yet provides ample ride height adjustment and tunability. How do these compare to a “real” coilover with solid eyelets mounts on either end?
The car sits on the spring, but the brunt of the coilover’s action is translated into the lower control arm, which is solidly mounted. “… There’s no real determent in performance,” Harmola says.
Essentially, both a bolt-in coilover and an eyelet-to-eyelet coilover will perform very similarly, with little performance left on the table. However, the bolt-in kits require a tapered spring that’s large at the top and 2.5 inches at the bottom. The industry standard is a 2.5-inch id spring and therefore many more options for springs are available for traditional-style coilovers. Pricing is similar, with tapered springs only being around 5 percent more expensive, but you must consider the costs of mounting requirements like lower control arms and top brackets/mounts.
“An eyelet-to-eyelet coilover would be the most durable application, as you have zero flex at the mounting points, no binds, and no deflection from bearings or grommets. But the shock will still perform essentially the same,” Saffell says.
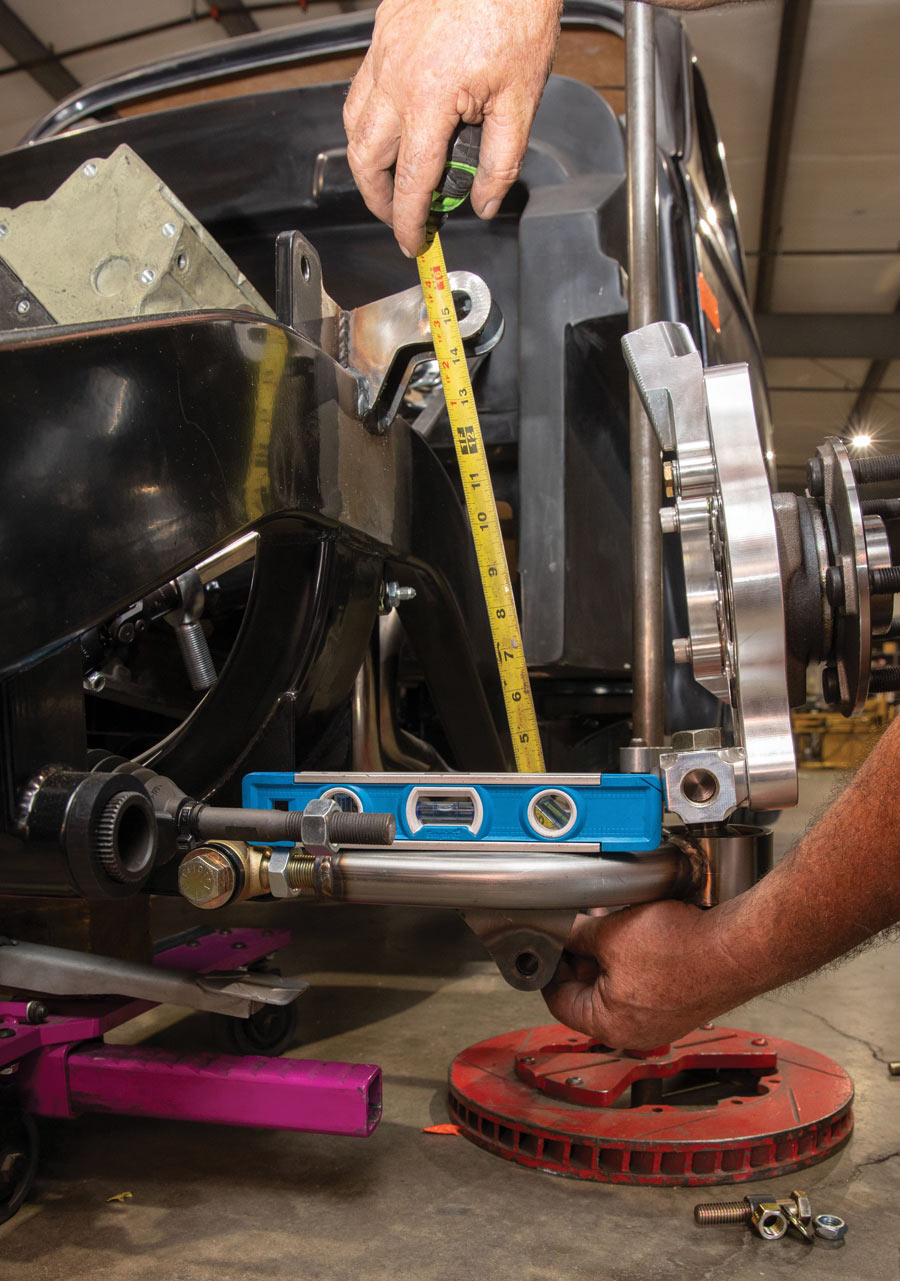
“We do our best to make a single part number solution, but with different things like wheels, tires, and control arms, we need a ride height measurement to get it exact,” Harmola says.
“First thing, set a goal and stick to it,” Saffell says. “Understand what you need. Is it a nonadjustable shock with the proper valving or double adjustable? You can start to hone in on what your shock needs to be.”
Set the car at the ideal ride height using blocks, jackstands, and/or jacks, just do it safely. However, you can still ruin your suspension performance if you put your suspension in a bind. If the ride height is too low or too high you’ll wear out components fast and possibly break something.
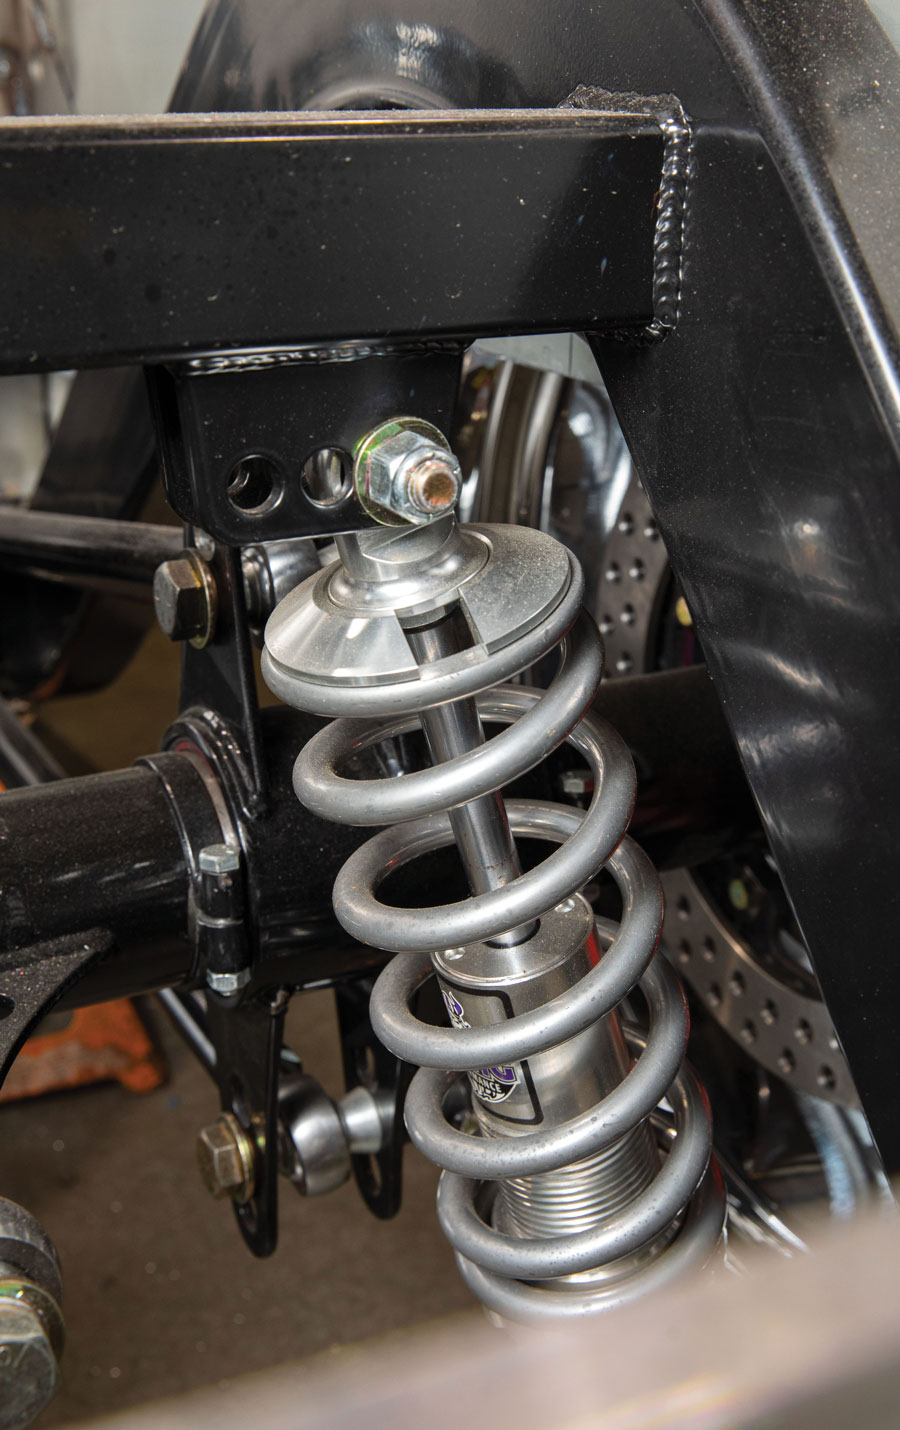
Check that the lower control arm is level with the ground. Ideally, your ball joints and tires will have a solid starting point before suspension travel.
Now, measure your mounting positions. Eyelet coilovers measure from the center of the eyelet on either side. Strut-mounted coilovers measure from the bottom washer under the rubber grommets to the lower mount or eyelet centerline.
“Manufacturers should show a compressed dimension and an extended dimension, center of the mount to center of the mount. Look for a shock that puts your measurements right in the middle. That’ll give you room for ride height changes,” Saffell says.
Next, weigh your car. Front/rear weights will help determine spring rate. “I took my first car to a truck stop. I got total weight, rolled back tires off to get front-only weight, and rolled front tires off to get rear weight. Then went in and got my ticket,” Saffell says.
Most manufacturers agree that setting the car up from the very beginning is vital in achieving a quality suspension refinement.
“Setup in terms of preload …” Harmola says. “You’re 95 percent of the way there. Then you can fine-tune the adjustment. With a track car, you may be swapping springs on race day, but not in a street car. Get that stuff right out of the gate.”
You should measure your car’s ride height before and after installing coilovers. Most manufacturers suggest around 1 inch of preload on the coilovers to start with. But once installed, measure the ride height on all corners and go from there.
For performance sake you want your car low, but not low enough to damage something or bind suspension components. “When we build a chassis, we already know what tires and combo we’re running, so we’ll build things into the chassis like a level lower control arm,” MRC Fab owner Jimmy Bullard says. “If you’re swapping from coil springs to coilover though you have to work with what you have.”
With a level lower control arm and preload above the recommended minimum (typically ¾ to 1 inch), you can then begin to play with your settings. Weight distribution plays a role in ride height as well. Before leaving for an autocross or road racing event, Jimmy and team will mark the vehicle’s frame height on all four corners, then reference it throughout the weekend.
The team may make mounting position or spring changes and then reset the ride height to their marks. This will allow for precise individual adjustments.
Be careful when you start making adjustments though, “If you got someone going under the car who starts spinning knobs there are ways to get lost if you don’t know what you’re doing. It’s trial and error,” Casio says. “You get the question of where I should set these, but if I could tell you that then we wouldn’t need adjustment knobs. The baseline is important from the car, then adjust one or two settings at a time and make notes. It’s important to put the time in to see what the car likes.”
“The better the shock, the more you can feel the change when you make a click,” Saffell says. When it comes to feeling a change in valving from the seat of the pants, the shocks that are of better construction, higher quality can typically produce that change more readily. A budget-minded shock is more difficult to achieve noticeable changes from click to click.
You get what you pay for, and if your goal is to have a suspension package that responds to change and you can feel it behind the wheel then “you should opt for as good of components as you can afford. Nothing is more frustrating than spending your money, looking for results, not realizing those results, and having remorse,” Saffell says. “Now you have to buy that component a second time. Always best to buy the component once.”
“It’s that initial movement on a drag car that’s important. So, if you have a loose extension of the shock it’s throwing that tire into the ground. That can be good, but if it’s too aggressive it’ll try to bounce off the rim of the track,” Casio says. “But if it’s not enough the tire will spin. You want to run your suspension as stiff as possible without spinning the tire.”
In autocross, you want that very first movement to be firm. That’s where valving plays a significant role in resisting the shock’s movement. “Like an oil pump, the faster the speed, the more the pressure. You want that first movement to be firm. You build it as soon as the piston starts to move. You want to have a lot of force to control body roll,” Saffell says.
“Big wheelstands are cool but that’s basically the chassis trying to drive out from under the car. It’s wasted energy. It looks great but hurts e.t.’s,” Casio says.


 SOURCES