ACP department heading TECH
InTheGarageMedia.com
Seal It Up

By Jeff Smith Photography by The Author

A Simple Modification That Updates ’60S Muscle Cars to Eliminate Updraft
W

hile we all love our older muscle cars for their style and performance, this is especially true for this writer when it comes to first-generation Chevelles. While they have tons of flair, they do lack a bit of sophistication when it comes to things like sealing the interior. This is nowhere more evident than the suggestion of a seal between the steering column and the floorpan. I own more than a couple of A-bodies that sport a near ¼-inch gap around the steering column that allows hot underhood air, dirt, and fumes to funnel straight up the steering column at road speeds.

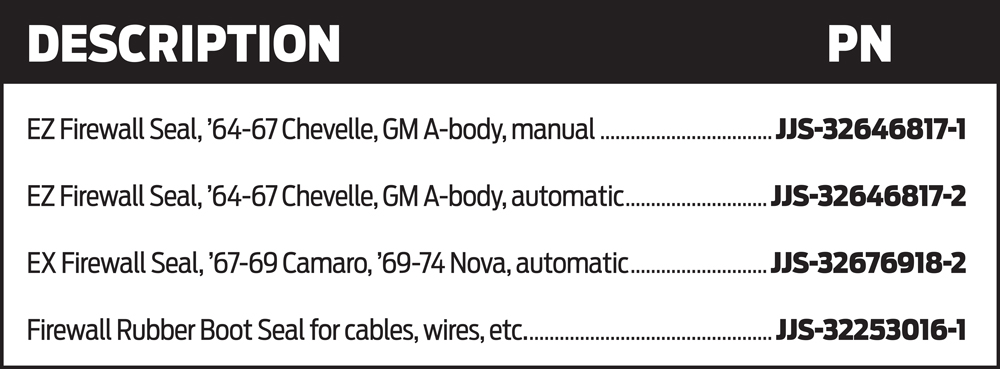
I’m in the midst of a complete restoration on our ’66 SS396 and I noticed a small ad in this publication for a firewall seal designed to solve this problem. JJ’s Rods is owned by Jeff Johnson. He experienced the same issue with many street rods and decided to come up with an answer for this little dilemma. This led to his E-Z Firewall Seal that he has now expanded into the muscle car market.

The E-Z Firewall Seal has won numerous street rod awards along with SEMA’s Product of the Year award in 2018 for its elegant and simple solution. With regard to the Chevelle and GM A-body market, Johnson offers a couple of different kits depending upon whether the car is equipped with an automatic or, as in our case, a floor-mounted four-speed to accommodate the manual clutch linkage. JJ’s offers a similar part specifically for early Camaros and Firebirds as well as ’69-74 Novas.

The seal is easy to install, especially in our case because we had yet to install the steering column. The entire process required roughly two hours, which included shooting all our photos. Of course, with the column in place on your car this will require removing it from the steering box to allow slipping the cover in place.

Check out the installation photos to see how little effort is required to seal up this rather bothersome interior road draft. After installing this new seal, you’ll wonder why you put up with this nasty updraft for so long.

The kit comes in a simple vacuum-formed cardboard that is easy to disassemble. This photo shows the main plate with the seal attached. This is the side that will face the firewall that is polished but has a protective cover over it so it won’t get scratched. The kit was designed for our four-speed SS396 Chevelle and accommodates both the steering column and clutch boot seals complete with stainless 1/4-inch bolts, nuts, and washers.
1. The kit comes in a simple vacuum-formed cardboard that is easy to disassemble. This photo shows the main plate with the seal attached. This is the side that will face the firewall that is polished but has a protective cover over it so it won’t get scratched. The kit was designed for our four-speed SS396 Chevelle and accommodates both the steering column and clutch boot seals complete with stainless ¼-inch bolts, nuts, and washers.
The mounting holes in the stainless plate lined up with the tiny factory sheetmetal screw holes in our firewall so we drilled each one with a ¼-inch bit to allow the larger bolts to fit through the firewall.
2. The mounting holes in the stainless plate lined up with the tiny factory sheetmetal screw holes in our firewall so we drilled each one with a ¼-inch bit to allow the larger bolts to fit through the firewall.
Here, we’ve set the stainless plate on the firewall with the large washers on the outside and only after this photo did we realize these washers are intended to be used on the inside. Note that we’ve kept the protective covering on the plate for now.
3. Here, we’ve set the stainless plate on the firewall with the large washers on the outside and only after this photo did we realize these washers are intended to be used on the inside. Note that we’ve kept the protective covering on the plate for now.
On the inside, we retained the original Chevelle interior plate to support the steering column as it passes through the firewall and used the large washers to retain the plate in the proper position.
4. On the inside, we retained the original Chevelle interior plate to support the steering column as it passes through the firewall and used the large washers to retain the plate in the proper position.
We measured the diameter of our ididit steering column at 2 inches and then transferred that measurement to the column seal and cut one layer inside that distance to ensure a tight fit over the column.
5. We measured the diameter of our ididit steering column at 2 inches and then transferred that measurement to the column seal and cut one layer inside that distance to ensure a tight fit over the column.
The E-Z Seal will fit any column from ¾- to 2¼-inch diameters. We trimmed the seal inside the 2-inch diameter with a razor knife but an X-ACTO blade will also produce an even cut.
6. The E-Z Seal will fit any column from ¾- to 2¼-inch diameters. We trimmed the seal inside the 2-inch diameter with a razor knife but an X-ACTO blade will also produce an even cut.
 We checked the fit of our first cut and with a little lube on the seal it fit over the column easily.
7. We checked the fit of our first cut and with a little lube on the seal it fit over the column easily.
The steering column boot is offset so we discovered it needed some adjustment before we found the correct position. Once the plate is bolted to the firewall, the seal won’t move so make sure it’s at the right angle before bolting the plate to the firewall.
8. The steering column boot is offset so we discovered it needed some adjustment before we found the correct position. Once the plate is bolted to the firewall, the seal won’t move so make sure it’s at the right angle before bolting the plate to the firewall.
We didn’t torque the attaching bolts and nuts down super tight because we did not want to dimple the stainless plate. To ensure the nuts remain tight, we placed a small amount of thread locking compound on the bolts. Now we can set the final assembly on our ididit steering column to complete the installation.
9. We didn’t torque the attaching bolts and nuts down super tight because we did not want to dimple the stainless plate. To ensure the nuts remain tight, we placed a small amount of thread locking compound on the bolts. Now we can set the final assembly on our ididit steering column to complete the installation.
SOURCES
ididit
(517) 424-0577
ididit.com
JJ’s Rods & E-Z Firewall Rubber Boots
(704) 681-1357
jjsrods.com